Showing posts with label Lemon. Show all posts

Saturday, January 12

Chicken Dum Briyani..

Chicken Dum Briyani. I had cooked this Briyani on my 3rd year marriage anniversary. From that time i had kept this in draft but never got the right time to post it. I think now i can't make this post to wait for any more, because for me tomorrow never comes. I used to think cooking Dum briyani is difficult then the normal briyani which is cooked by mixing every things together, but it is not right. They both take same effort and same time.. Now I prefer dum briyani because it taste better then the normal briyani... I have not used deep fried onion in this recipe, i have saved it for one more recipe of dum briyani. Do try and let me know.


Ingredients.
1/2 kg Basmati rice 
Chicken 1/2 kg
Few strands for saffron 
2 big size onion, 4 tomato (finely chopped)
3 green chilly (chopped) 
4 to 5tbsp of chopped coriander and mint leafs
2tbsp Ginger, garlic paste
2tbsp red chilly powder, 1tbsp turmeric powder 
1tbsp coriander powder, 1tbsp garam masala 
1cup curd, 2tbsp lemon juice
Salt as per taste.


For Tempering.
2 bay leafs, 1 cinnamon stick, 2 green cardamom
2 cloves, 1 big black cardamom, 2 star anise
1tbsp shah jeera 
Oil as per your requirment.


Cooking method.
Wash and soak the rice in enough water for 20 to 30 minutes. In the same time soak the saffron also in warm water. 
Heat the deep frying pan add oil, when oil is hot, add all the tempering ingredients and leave till it become's brown. 
Then add onion, ginger garlic paste fry for till the onion becomes lite golden brown, then add chicken, turmeric, and salt, fry it till the chicken starts leaving oil. 
After that add red chilli powder, coriander powder and garam masala, give a quick stir, then add tomato, curd, lemon, green chilly, and cook till the tomatos becomes soft, then add 2tbsp of mint and coriander leafs and mix it well.
Half boil the rice in a seprate pan. add water in to rice as per it required's. Then in a separate big pan add one layer of chicken and one layer of half boiled rice. Then sprinkle from top saffron water and left over mint and coriander leafs. (you can make as many as layers you like, but i have made one 2 layers). Cover the lid and cook till the rice is completely cooked in a medium flame.
Serve hot hot with (Raita)


Thursday, December 27

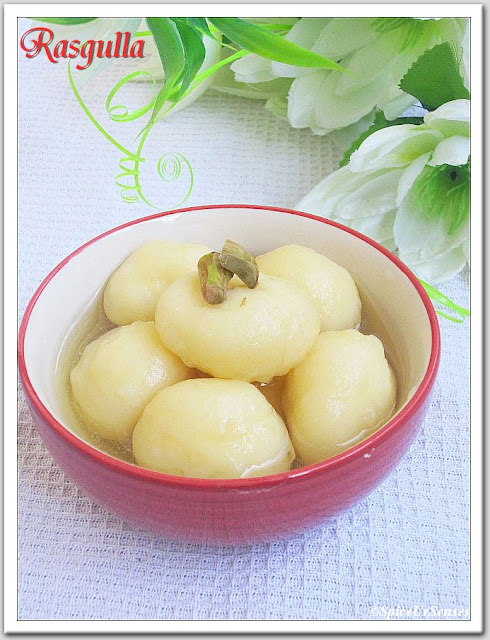
Bengali Rasgulla..

Rasgulla it is popular throughout India and other parts of South Asia. The dish is made from ball shaped dumplings of chhena (an Indian cottage cheese), cooked in light sugar syrup. This is done until the syrup permeates the dumplings. This was the first attempt and i was quite happy with the result.


Ingredients:
4 cups milk
1/4 cup lemon juice
1 1/2 cups sugar
4 1/2 cups water
1tsp arrowroot flour
Pressure cooker.


Method for Paneer/Chhena
Mix lemon juice in half cup of hot water and keep aside.
Boil the milk in a heavy bottomed pan over medium heat, stirring occasionally, making sure not to burn milk.
As the milk comes to a boil, add the lemon juice gradually and stir the milk gently. The curd will start separating from the whey, turn off the heat.
Once the milk fat has separated from the whey, drain the whey using a strainer line with muslin cloth.
Wrap the curd in a muslin cloth, and rince under cold water, and squeeze well. This process takes out the sourness from the lemon.
To check if enough water is out of the paneer, take a little piece of paneer on your palm and rub with your fingers. After rubbing the paneer for about 15-20 seconds, you should be able to make a firm but smooth ball.
Once the paneer is drained, place on a dry, clean surface and knead the paneer for 3-4 minutes until the paneer is almost rolls into smooth soft dough.
Knead the paneer and arrowroot flour by dragging the palm of your hand hard on the paneer. Keep scooping it back to togather and knead more. If the paneer is too crumbly, add a teaspoon of water. Your palm will be little greasy.


Method For Rasgulla 
Divide the dough into 12 equal parts and roll them into smooth balls.
To make the balls apply some pressure at the first and then release when forming the balls.
Mix the sugar and water in a pressure cooker on medium high heat and bring to a boil.
Add the paneer balls and close the pressure cooker. After the pressure cooker starts steaming, turn the heat to medium and cook for about seven minutes.
Make sure the pressure cooker is large enough to accommodate the finished Rasgullas, as they will expand to about double in the volume while cooking in the syrup.
Close the heat and wait a few minutes before you opening the pressure cooker. Pour cold water over the pressure cooker before opening.
Rasgullas should be little spongy. Serve the Rasgullas chilled.


Friday, October 26

Bundt Cake .. In My Style!!! (Eid Special)

Bundt Cake, this was my dream to bake this cake from a long long time but never had confidence. Last week i was just going through few blogs, from there i got this recipe and i got the confidence to give it a try. I have changed few ingredients and the measurement to this bundt cake original recipe, and it was the best cake i have ever made. Though this was my first attempt to bake this bundt cake, believe me i was shocked by the results. Thanks to the people who made this bundt cake and also gave me the confidence to bake this very difficult cake.. Here is the recipe for you all...


Ingredients
2 1/2 cups all-purpose flour
1 tablespoon ground cinnamon
2 teaspoons baking powder
1 teaspoon salt
1/2 teaspoon baking soda
1 cup unsalted butter, melted
1 1/2 cups sugar
1 large lemon and lemon zest
4 large eggs.


For Glaze on top 
1 cup confectioners' sugar
1 to 2 tablespoons water.


Baking Method
Preheat oven to 350 degrees. Make the cake. In a medium bowl, whisk together flour, cinnamon, baking powder, salt, and baking soda.
In a large bowl, combine butter, brown sugar, eggs, lemon juice and zest. Whisk until smooth. Gradually whisk in dry ingredients just until combined (do not overmix). Pour the batter in to the prepared bundt cake pan and smooth top.


Bake until a tester inserted in cake comes out clean, about 50 to 60 minutes. Cool in pan on rack 15 minutes, invert onto rack to cool completely.
Make the Glaze. Whisk together confectioners' sugar and enough water to form a thick yet pourable glaze. Set rack with cake over a piece of wax paper (for easy cleanup) drizzle cake with glaze, and allow the glaze to set before serving. Cut into pices and serve with some whipped cream or as it is.


Wednesday, September 12

Madeira Cake!!!

Madeira cake is a sponge cake in traditional English cookery. The Madeira Cake has a firm yet light texture, eaten with tea or rarely for breakfast and is traditionally flavoured with lemon. Dating back to an original recipe in the 18th century or 19th century, it is not unlike a simple pound cake or yellow cake. The Madeira Cake is sometimes mistakenly thought to originate from the Madeira Islands; however, that is not the case as it was instead named after the Madeira wine, which was popular in England at the time and was often served with the cake. Nowadays, it is often served with tea or liqueurs. (Source from wikipedia)


Ingredient's
Softened Unsalted Butter - 1 cup
Fine Grain Sugar - 3/4 cup (plus 1 tablespoon for sprinkling)
Lemon - 1 (Grated Zest and Juice)
Eggs - 3 large
Self Rising Flour - 1 and 1/3 cup
All Purpose Flour - 1/2 cup
Baking Powder - 1/4 teaspoon
9 x 5-inch Loaf Pan - Buttered and Lined


Cooking Method
Get all the ingredients at room temperature before starting. Preheat the oven to 180 degrees C.
Sift the self rising flour, all purpose flour and baking powder, together, Thrice and keep aside. Cream the butter and 3/4 cup sugar using an electric beater. Once they are well creamed, grate in the zest of the lemon. Beat well till it is combined.


Add the eggs one at a time with a tablespoon of flour for each. Beat well after each addition. Once all the 3 eggs are in, and the mixture is well beaten, gently FOLD IN, with a wooden spoon, the rest of the flour in small batches. Finally put in the juice of the lemon. Mix well with the spoon and pour the batter into the prepared tin. Sprinkle the top with sugar as it goes into the oven.


Bake for 1 hour or until a tester comes out clean (mine got done in just under 50 minutes. I suggest you check after 45 minutes to prevent any burns. Remove the tin to a wire rack and let cool in the pan before turning out.


Tuesday, July 17

Veg Hot Dog.. Veg Patties Roll!!!


Ingredient's
1 boiled potato
1 Green Chilli, (finely chopped)
1/2tsp ginger garlic paste
1/2 tsp Red Chilli powder
1 tbsp Lemon juice
1/2 cup chopped Coriander Leaves
2 tbsp Corn Flour
Salt to taste
Mustard Sauce
Tomato Sauce
3 Hot Dog Buns
few lettuce leafs
1/4 cup chopped Onion.


Cooking Method
Boil potato in pressure cooker just until one whistle. Peel boiled potato and mash really well. Mix green chillies, garlic ginger paste, red chilli powder, lemon juice in a blender and grind to make very smooth paste. Add ground masala to mashed potatoes, also add salt to taste, coriander leaves, corn flour, and mix well. Form long patties from potato mixture. Heat a pan over medium heat add a tsp of oil and shallow fry patties till it gets nice golden crust from all the sides. Make sure to flip patties once in a while to avoid sticking of it to pan. Once all patties are shallow fried, butter hot dog buns inside out and roast on the same pan till it gets nice crust. Now take one of roasted hot dog bun, on the middles of that place lettuce leafs and onion on top of that place hot dog Pattie. Add mustard and tomato sauce on the hot dog patties. You can add cheese if need.
Serve hot with extra mustard or tomato sauce!


Sunday, June 10

Raw Mango Juice With Khus Syrup!!!

It is been a long time i posted any recipe due to internet connection in my area. I have so many recipes pending to post and now since the internet got good and all the problem have solved so it is time to post it fast fast, so that i can get all my blogger friend back to my blog. I apologize for not visiting regularly to my blogger friends blog. I can say that i was very lazy to do anything and these days i had spent sleeping and shopping.


This is the mango season and every body would want to try and cook something new with mango's. I gave a try with khus syrup & raw mango and it turned out very refreshing and tasty.. Do try and let me know !!!


Ingredient's
1 raw mango peeled and cut into small pieces
2tbsp sugar, 1pinch salt
2tbsp khus syrup
1tbsp lemon juice
2cup cold water


Method
Add all the ingredients in the blender.
Mix in blender for 30 to 40 seconds.
Pour into chilled cups. and Serve chilled.


Sunday, February 12

Khus Syrup With Lemon Cooler

Citrus khus cooler, chilled drinks are definitely cool, but they may not necessarily be cooling! on hot summer days, especially if you are going to be serving spicy food at your party, it would be ideal to have cooling drinks such as this one, this combination of khus, kewra and falooda seeds makes a delicious drink with cooling properties. Always serve in a tall glass with lots of crushed ice..


Ingredient's
4tbsp khus syrup
2tbsp lemon juice
1tbsp basil seeds (Soked overnight)
1 large mug cold water
few eyes cubes


Method
Combine the khus syrup, cold water, lemon juice and crushed ice in a cocktail shaker and shake well. Then transfer it to mug and add basil seeds. Pour the drink into 4 individual tall glasses and serve garnished with Lemon and Mint.

Friday, December 9

Prawn Biryani (Pressure Cooker Version)

Prawn Biryani.. The delicious and tastiest biryani i have ever eaten. I have become a huge fan of this dish from the day i have cooked. Though it was bite of sweet in taste because of prawns but awesome. You guys must be thinking when ever i cook biryani i always cook in pressure cooker, right!! Let me explain. Cooking in pressure cook is very easy compare to open pot, because it saves lot of time and efforts, and i personally feel it taste good too. You might also like some more recipe's of Prawn.


Ingredients
1/2 kg Basmati rice, 1/2 kg Prawns
2 big size onion, 4 tomato, 3 green chilly. Finely chopped
3tbsp of chopped mint and coriander leafs
2tbsp Ginger garlic paste
2tbs red chilly powder, 1tbs turmeric powder, 1tbs coriander powder, 1tbs garam masala
1cup curd, 2tbsp lemon juice
2 bay leafs, 3 dry red chilly
2 small green Cordamom
Pinch of orange food color
Oil and Salt as per taste.


For marinating prawns
1cup curd
2tbsp lemon juice
1/2tsp ginger garlic paste
Salt as per taste.

Cooking Method
In a large mixing bowl, add curd, lemon juice, ginger garlic paste, salt and prawns, mix it well and keep it the fridge for 30 to 40 minutes. Soak the rice in 1 cup of water for about 10 to 15 minutes with food color. Heat pressure cooker and, add oil, elaichi, bay leafs, and red chilly, leave till it become's brown. Then add onion, green chillies and fry to golden brown. after add all the masala powder and ginger garlic paste, fry for another 10 to 15 minutes. Now add the tomatos and fry till it starts leaving oil. Now add the marinated prawn and rice. Give a good mix and from top add mint and coriander leafs. Add salt if needed. Close the pressure cooker lid and cook for 3 whistle(1 in high flame and 2 in low flame). Serve hot with Raita.


Tips: Don't add too much of water. When you are cooking in a pressure cooker. If you are using Basmati Rice. Soak the rice in a water for 10 to 15 minutes before cooking for the best result.

Sunday, November 20

Grilled Chicken With Mash Potato And Stirfry Vegetables....

From last couple of weeks my Sunday's are generally getting boring in terms of cooking. It seems that i have reached to the saturation of cooking same food and with same ingredients over and over. Usually i get chicken and cook it with Indian chicken masala and spices.So the flavors are almost same irrespective of how much variation i try in cooking with spices and chicken masala.
Last night i tried a new variation of saute vegetable with minimum oil. It was so yum to eat and my husband also liked it very much. So he asked me to prepare tomorrow's lunch with same saute vegetable and combination of chicken and mash potato. I should thanks to him for giving me a wonderful and new idea for preparing such a yummy dish for this Sunday's lunch.


Ingredient's (To Marinate Chicken )
2 chicken breast
1tsp black pepper seeds
1/2tsp mustard seeds
10 garlic cloves
1/2tsp oregano
1tsp white vinegar
1tbsp lemon juice
3tbsp oil and Salt to taste

Cooking Method
Make a small slit on the chicken breast and set it aside. Mix all the above ingredients in a blender (including 2 1/2tbsp oil and salt) and make a smooth paste. Then apply on the chicken breast and keep it in the fridge for 1hour. Now heat a non stick pan with 1/2tbsp oil, and place the chicken breast and fry to golden brown both the side, with close lid.


Ingredient's (For Mash Potato)
3 boiled potatos
50 gram butter, room temperature
1tsp garlic paste
1/2tbsp dried oregano
3tbsp fresh cream
Salt to taste.

Cooking Method
Mash the boiled potato in a large mixing bowl. Then add the garlic, butter, oregano, fresh cream and salt, mix it well and keep it in the fridge.


Ingredient's (For Stirfry Vegetable)
Half cabbage, 1 large carrot, 5 french beans. (cut in to stripes)
1/2tsp soya sauce, 1/2tsp red chilly sauce
Salt to taste
1/2tsp oil.

Cooking Method
In a wok add oil, when it is hot, add cabbage salt and half of the soya sauce and stirfry in a high flame for 3 to 4 minutes, Then in a same pan add carrot, beans, salt, chilly sauce and left over soya sauce, and stirfry in a high fame for 2 to 3 minutes.

Sunday, October 16

Chicken Lollipop!!!!

Many a times while eating chicken lollipop in restaurants i always had this question in my mind -"How do they cook?" Recently while shopping in Reliance fresh i saw the frozen chicken lollipop and that time only i decided to cook and surprise him. As always he was fully surprised... Do try this simple recipe and let me know how was it tasting.. 
Some more recipe's of Chicken...


Ingredient's
6 chicken lollipop
1tsp red chilly powder, 1/2tsp turmeric, 1/2tsp coriander powder
1tbsp ginger garlic paste, 2tbsp lemon juice, 2tbsp maida
Bread crumbs (for coating)
Salt to taste
Oil for deep frying


Cooking Method
Wash and keep the chicken aside. In a mixing bowl add all the masala powder, ginger garlic paste, lemon juice and salt, make a thick paste. Then add the chicken lollipop and mix it nicely. Keep in the fridge for atleast 1hour. Before frying coat the lollipop with bread crumbs. Then add enough oil in a deep frying pan and fry the lollipop to golden brown...
Serve hot with tomato sauce.

Wednesday, October 5

Egg Biryani.... (Pressure Cooker Version)


Ingredients
4 hard boiled egg, and 1/2 carrot chopped
2 cup Basmati Rice, pinch of food color
2 Onions,3 Tomatoes, 4 Green chillies, Mint leaves finely chopped
2 tsp Ginger garlic paste
3 Cardamoms
1-1/2 tsp Chilly Powder, 1 tsp turmeric, 1 tsp garam masala,3 tsp Coriander Powder
3 bay leaves and 4 dry red chillies
1 Lemon, 1/2cup curd
3/4 cups Oil/ghee
Salt to taste


Cooking Method
Clean and soak the rice for 1 hour in enough water taken in a pot and add the pinch of food color. Heat oil in a pressure cooker and add bay leaves and red chillie, when they turn into brown, add onion and green chillies sautee to golden brown, Than add all the masala powder and fry till oil seprates, now add chopped tomato, lemon and curd fry till tomatos are soft, then add the eggs, carrot and little salt fry for 2 to 3 minutes. Then add the rich and mix it gentely and close the lid, and cook for 3 whistle (1 in high flame, 2 in low flame)
Serve hot with rita..

Thursday, September 15

American Apple Pie...


Ingredient's
1 1/2 cups of flour
1/2 teaspoon of salt
3/4 of a stick or 90 g of unsalted butter
5 tablespoons of cold water or apple cider
1 egg (for brushing, helps the surface get golden)
Milk (for brushing, optional)

Filling
1 tablespoons lemon juice
80 mL or 1/3 cup of white sugar
80 mL or 1/3 cup of brown sugar
1/4 teaspoon of salt
3 tablespoons of flour
1/2 tsp cinnamon powder
2 medium-sized apples
Preheat the oven to 400ºF (200ºC).

How to Bake Pie

Make sure you have a clean, spacious countertop available for kneading and rolling out the dough.
Place the flour, salt, and butter in a large bowl. With a pastry blender or fork, smash up the butter until it forms tiny balls with the flour. Then slowly add the water.


Knead with floured hands until a large dough ball forms. Split the ball in half and wrap one of the piece in plastic wrap. Place the wrapped dough in the refrigerator. An alternative is to wrap both of the dough balls and refrigerate them for 30 minutes before proceeding to the next step.


On a floured counter-top, begin to roll the dough out into a circle shape about 2 inches larger in diameter than the pie pan. Some people prefer to place a layer of plastic wrap on top of the dough as it's being rolled so that it doesn't stick to the rolling pin.


Slowly lift the flattened dough off the counter-top by wrapping it completely around the rolling pin.
Unroll the dough over the pan, being careful not to let it tear. Fit it into the pan, pressing it against all the sides.
Cut off the overhanging edges. Leave about 1/4 inch of extra dough over the pie pan. Place the pie shell in the refrigerator.


Make the filling. Peel and slice the apples into pieces about 1/8 of an inch thick or chop them into 1/2" cubes. Put them into a large bowl and mix with sugars (white and brown), salt, lemon juice, flour, and cinnamon (shake over to cover the top of mixture). Place in refrigerator.


Roll out the remaining ball of dough on a floured surface, just like you did before. Sliced top. Gently fold it in half and make 4 to 5 half inch long slices along the fold and 4 slices in the center of the folded piece. These will allow the filling to breath and not break through the sides. Unfold the top crust set it aside. 
Lattice top. Cut the rolled out dough into as many 1" wide strips as it will yield.


Remove the pie shell and filling from the refrigerator.
Pour the filling into the pie shell, spreading it out with the back of a spoon. There should be enough filling to fill the entire pan and stack up above the edge at least an inch in the center.
Brush the edges of the pie shell with a beaten egg.


Lay the sliced top crust over filling. Cut off the excess edges with a butter knife. Take both thumbs facing each other and place them over the edge. Push thumbs down and towards each other. Do this around the entire pie to seal it.

Place the pastry strips across the top of the apples in a criss-cross pattern, then weave them together to create a lattice effect. Cut off the overhanging excess pastry and press the edges down into the rim as previously described. Sprinkle milk over the top or brush the lattice with the egg wash. This will help to brown the crust. Dust cinnamon and sugar over the top crust for an extra touch.
Bake at 400ºF (200ºC) for 15 minutes. Turn down the oven to 375ºF (190ºC) for 45 minutes. Remove when top crust is golden brown. Allow pie to cool 45 minutes to 1 hour at room temperature before serving.
Apple pie is ready to serve...

Wednesday, March 23

Silver Pomfret Fish Fry

Last month when i had tried cooking Pomfret for the first time, it had horribly failed as the skin was peeled off while frying and fish was broken. Though it tasted good but was not so pleasing to eyes :( 
So i was really afraid that if would be able to get that perfect cook. But at the end effort paid off and i am very happy today.


Ingredient's 
2 silver pomfret fish, wash and clean
2tbs red chilly Powder, 1tbs Garam masala , 1/2tbs turmeric, 1/2tbs coriander powder 
1/2tbs Ginger garlic paste 
2tbs lemon juice 
Oil as per required 
Salt as per taste


Cooking Method 
Make a paste of all the masala powder, add salt, lemon, ginger garlic paste, mix it up, Then apply it on the fish both the side (In n out), Keep it in the fridge for 2 to 3hour. Heat up the frying Pan (Tava) add oil, when oil is hot, place the Fish on tava, fry both the side to golden brown 
Garnish and Serve hot with (Drinks, Roti, or as a side dish)


Wednesday, March 9

Mushroom Biryani (Pressure Cooker Version)

I just made few changes in the method of preparation. It came out so yummy that my husband enjoyed and asked me to prepare it again for this weekend. I have never tried biryani in this style. I can bet you this is the best mushroom biryani I ever had,and very easy to cook also. Here you go…


Ingredients
200 gms Mushroom, 1/2cup mutter, and 1/2 carrot chopped
4 cup Basmati Rice, pinch of food color
2 Onions,3 Tomatoes, 4 Green chillies, Mint leaves finely chopped
2 tsp Ginger garlic paste
3 Cardamoms
1-1/2 tsp Chilly Powder, 1 tsp turmeric, 1 tsp garam masala,3 tsp Coriander Powder
3 bay leaves and 4 dry red chillies
1 Lemon, 1/2cup curd
3/4 cups Oil/ghee
Salt to taste 


Cooking Method
Clean, wash and soak the rice for 1 hour in enough water taken in a pot and add the pinch of food color.Trim mushrooms into big pieces and keep it aside.
Heat oil in a pressure cooker and add bay leaves and red chillie, when they turn into brown, add onion and green chillies sautee to golden brown, Than add all the masala powder and fry till oil seprates, now add chopped tomato, lemon and curd fry till tomatos are soft, then add the mushroom, mutter, carrot and little salt fry for 2 to 3 minutes. Then add the rich and mix it gentely and close the lid, and cook for 3 whistle (1 in high flame, 2 in low flame)
Serve hot with rita..

Thursday, December 16

Soya Chunks Biryani (Pressure Cooker Version)

Soya biryani is a protein rich biryani recipe with the soya chunks cooked and then added to rice along with whole spices and garam masala powder.. This was my first attempt to cook the soya chunks biryani and it turned out as usual very tasty. I was not even prepared to cook this biryani but just because of my S-I-L i cooked this biryani. Even i was also thinking that our breakfast and lunch is being repeated again and again,so when i opened my draw i saw a pack of Nutarila soya chunks so i thought why not to give a try in soya chunk only. First i thought to prepare paluo and finally finished with biryani... And it was very tasty and very healthy too..


Ingredient's
2 cup of soya chunks
1/2kg basmati rice
2 cup of all veggie's (mutter, gobi, potato, carrot) cut in to small pieces
2 onion, 3 green chillies, 3 tomatos, finely chopped
1/2cup curd, 3tbsp of lemon juice
1tbsp red chillies powder, 1tbsp turmeric, 1tbsp coriander powder
1 cardamom , 3 tej pata, 3 dry red chillies
Oil and Salt as per taste


Cooking Method
Soak the soya chunks in water for 20 minutes, Then in a pressure cooker add oil, red chillies, tej pata and cardamom , after 20 sec, add onion and green chillies fry to golden brown, add all the masala powder, and fry 5 minutes then add tomato, curd and lemon juice and cook for another 5 to 10 minutes, Now add the soya, all the veggies and salt, then allow the veggies to soak the masala and then finally add the rice and water as per required, and cook for 3 whistle, 1 in high flame and 2 in low flame.
Serve hot with Raita.

Sunday, November 21

Grill Chicken Kabab

First time i tried cooking chicken in a oven, thinking that whether it will be good or not but fortunately it came out so well and tasty. Now i feel that it was worth buying a oven, When i had bought oven, i was thinking that i will cook many different dishes and i tried 2 to 3 dishes which didn't turn out well so i was bit upset, and i was telling my hubby it is waste of money. Today my hubby forced me to grill chicken in oven and i am thankful to him for bringing back the interest in me to cook in oven. This chicken was so so tasty and every one was very happy and that makes me very very happy:)


Ingredient's
6pcs of chicken 
3tbsp of lemon juice
1/2tbsp of red chilly powder, 1/2tbsp of turmeric powder
1/2tbsp of coriander powder, 1/2tbsp of ginger garlic paste
Salt to taste


Cooking Method
In a mixing bowl add the above ingredients make a thick paste, marinate chicken and set it aside for 1hour
Pre-heat the oven in 180c  for 10minutes, then put the chicken pieces in a rotisserie rod and apply  lemon juice and oil and grill it for 25 to 30 minutes.
Serve with Drinks and enjoy.


Related Posts with Thumbnails