Tuesday, January 29

Pull-Apart Bread With Spicy Herbs And Pizza Sauce!!!

Pull-Apart Bread. Last week i was seeing this bread post in almost every blog, and i was very tempted to bake this bread. When ever i bake i have problem with yeast and which ever brand i buy. Actually i knew that gloripan yeast is good, i had read lot's of review about gloripan yeast, but i was not sure where do we get it. Then i started searching on net to buy Gloripan yeast near by my house, i got one in mission road which is pretty far from my house, and i asked my hubby should i go, as always he said will go on weekends and it is very sunny outside. Even i thought the same and kept quite for some time but my heart din't agree with me, without telling him i just took my bike and went searching the address. GUESS WHAT!!! I got the address and i rush to shop and bought the yeast.. After coming back home i started preparing to bake fast fast and finely my bread came out so yummy and perfect.. He also love it.

I should thank to Divya Kudua from EasyCooking for her very useful post and step by step pictures which made my work easy. I have followed her same steps but different ingredient's, This was my first attempt to bake bread a perfect bread and i'm very happy with the way bread was looking and tasting.. Thanks everybody for baking so many different types of Pull-Apart Bread and making me to start baking.. I'm sending this recipe to We Knead To Bake#1 event hosted by Aparna of My Diverse Kitchen.


Ingredients.
For the dough
1/2cup Warm milk
1/2tsp Sugar
1tsp Active dry yeast(I used Gloripan Yeast)
1 1/2cup All purpose flour
1/2tsp Salt
1tbsp Butter(soft at room temperature)
1tsp Ginger Garlic Paste
2tbsp Milk + a couple of tbsp to brush over the bread


For the filling
2tsp Melted butter 
1tbsp Mixed Italian herbs
1/2tsp Chilli flakes
2tbsp Grated Mozzarella cheese
1tbsp Pizza Sauce
1/2tsp Black Sesame Seeds.


Baking Method
In a small bowl, dissolve the sugar and the yeast in the 1/2 cup of warm milk. Keep aside for about 5 minutes till the yeast mixture bubbles up.
Put flour, salt, softened butter, and ginger garlic paste in a large bowl mix.
Then add the yeast mixture and the 2tbsp of milk and knead till you have a soft, smooth and elastic/ pliable dough which is not sticky. Add a little extra flour if your dough is sticking, but only just as much as is necessary.
Shape the dough into a ball and place it in a well-oiled bowl, turning the dough to coat it completely with oil. Cover and let it rise for about 1 1/2 hours or until almost double in volume.
Dust your work surface lightly with flour. Deflate the dough, shape it into a square and roll the dough out into a larger square that is about 12’ by 12”. Brush the surface of the square with the melted butter. Evenly sprinkle the herbs, chilli flakes, pizza sauce and then the grated cheese.


Use a rolling pin to very lightly press the topping into the dough to ensure the topping doesn’t fall off when you are stacking the strips.Using a pizza cutter, slice the dough from top to bottom into 6 long and even strips. Lay each strip on top of the next, with the topping facing upwards, until you have a stack of the strips.
Using a sharp knife, cut straight down through the stack dividing it into 6 equal pieces (6 square stacks).
Grease and lightly flour a loaf tin. Layer the square slices, cut sides down into the loaf tin.
Cover the loaf tin dough with a towel and allow the dough to rise for an hour. Lightly brush some milk over the top of the loaf and sprinkle the black sesame seeds from top.
Bake the dough at 180C (350F) for about 30 to 40 minutes until it is done and the top is golden brown.
Pull-Apart Bread is ready. Serve Warm.


Sunday, January 27

Idli Sambar and Chutney!!!

Idli Sambar and Chutney. Very often i cook idli for our breakfast, because i feel it is the best food to start our day. I have been thinking to take pic for a very long time, but i use to always feel very lazy and hungry after seeing hot idli and always use to postponed it to next time. On last Saturday i was very much prepared to take a pictures. So as soon as i cooked idli i took the pictures and later i served to everybody. The idli was very soft and it was going very well with spicy chutney and vegetable sambar..


Ingredients
1cup raw rice
1/2cup urad dal
1/2tsp fenugreek seeds
Salt to taste
1tbsp Oil for greasing
Water to mix
A pinch of Baking Soda (optional)


How to make Idli
Soak urad dal, fenugreek seeds and rice separately in water, for over night or about 5 hours.
After due time, grind the soaked ingredients in a mixer to make a smooth paste.
Now leave the paste aside, for about 8 hours.


Afterward add salt and baking soda to the paste. Mix well.
Pour the mixture gradually into the greased cavities of an Idli Stand.
Keep the Idli Stand in a idli cooker to steam for a 5 to 8 minutes.
Then, carefully take out the stand and remove the the idlis, using a spoon.
Repeat the procedure for the remaining mixture.
Serve them hot with chutney and sambhar.


Friday, January 25

Moong Dal Dosa (Split Lentil Dosa)

Split Moong Dal Dosa. This time to make this dosa i have used the split moong dal, but the other ingredients and procedure are the same, what i had used for the whole moong dal dosa. Also this taste was different from the whole moong dal dosa. I felt that i have cook moong dal dosa very often because it is healhty and tasty too.  In this photo i have made two different types of dosa, 1 is very crispy and the other 1 is non crispy. So you decide what type of dosa you prefer. I served this dosa with Coconut and Mint chutney...


Ingredient's
1/4cup split moong dal
1/4cup rice
2tbsp urad dal
2 green chilli, 1tsp ginger garlic paste
Salt to taste
Water as requires.


Cooking Method
Soak the split moong dal, urad dal and rice in water overnight. Next day drain the water and grind the dal and rice along with green chilies, ginger garlic paste and salt to make a fine paste of medium consistency. Remove the batter and mix it thoroughly adjusting the salt.
These dosas need no fermentation and you can make dosas immediately.


Apply little oil on a non stick pan. Make sure that the pan is hot by sprinkling some water. Pour one ladle full of batter into the center of pan and spread it around in a circular fashion shaping the batter into a thin round. 
Then sprinkle some more oil around the edges of the batter. Wait for few minutes until the bottom turns golden brown and then reverse it. Cook the other side now for few seconds.


Remove from the pan and serve hot with Chutney.
And repeat the same processes for the rest of the batter.


Iam sending this recipe to Jaruti's of Cooking Odyssey.Celebrate MakarSankranti and Republic Day of India.


Thursday, January 24

Whole Moong Dal Dosa!!!

Whole Moong Dal Dosa. This dosa is very healthy and very tasty dosa and to make this dosa you don't need more time, you can make this dosa for breakfast in a very less time. Even you can add finely chopped onion from top, but i have not added onion in to it. First i wanted to try this recipe without onion, adding or not adding onion the taste will not change. I served this hot dosa with peanuts chutney and hot cup of tea, it was very very taste. Do try and let me know...

Ingredient's
1/4cup whole moong dal (Green gram)
1/4cup rice
2tbsp urad dal
2 green chilli, 1tsp ginger garlic paste
Salt to taste
Water as requires.
Cooking Method
Soak the whole moong dal, urad dal and rice in water overnight. Next day drain the water and grind the dal and rice along with green chilies, ginger garlic paste and salt to make a fine paste of medium consistency. Remove the batter and mix it thoroughly adjusting the salt.
These dosas need no fermentation and you can make dosas immediately.
Apply little oil on a non stick pan. Make sure that the pan is hot by sprinkling some water. Pour one ladle full of batter into the center of pan and spread it around in a circular fashion shaping the batter into a thin round.
Then sprinkle some more oil around the edges of the batter. Wait for few minutes until the bottom turns golden brown and then reverse it. Cook the other side now for few seconds.
Remove from the pan and serve hot with Chutney
And repeat the same processes for the rest of the batter.

Iam sending this recipe to jagruti's of cooking odyssey. Celebrate MakraSankranti and Republic Day of India.


Friday, January 18

Bread Pokada.. Bread Fritters.

Bread Pokada. First time i ate this bread pokada in faizabad after my marriage. It was good but some how i din't like it that much, i felt it was too oily. Most of the time when we go to my in-laws place, my elder brother in-law brings this bread pokada from his favorite shop for breakfast, because my hubby like's to eat this oily stuffs sometime. He was telling me from a long time to cook break pokada, i also use to tell him ask me anything to cook i will cook for you immediately except bread pokada. On last saturday he had gone for a hair cut and i felt this is the right time i should cook few bread pokada before he come's home, but before i prepare to cook he was home :) After seeing me cooking he was happy. I served with some mint chutney, tomato sauce and hot ginger tea.


Ingredient's
4-5 Bread Slices
1cup Gram Flour (Besan)
1/4th tsp turmeric powder
1/4th red chili powder to taste
1/4th tsp Garam Masala powder
1/4th coriander powder
1/2 tsp Ajwain
Salt to taste
Oil for frying
Water to make a batter


Cooking Method.
Heat oil in a kadhai. Cut Bread slices into desired shapes (like triangle, rectangle etc.)
In a bowl add gram flour, salt, chili powder, garam masala, coriander powder, turmeric, ajwain and mix it.


Now by pouring little water at a time to make a smooth batter (neither too thick nor too lose)
Dip bread piece in the batter and fry till crisp on medium flame.
Serve bread pakora hot with Green Chutney and Tea.


Saturday, January 12

Chicken Dum Briyani..

Chicken Dum Briyani. I had cooked this Briyani on my 3rd year marriage anniversary. From that time i had kept this in draft but never got the right time to post it. I think now i can't make this post to wait for any more, because for me tomorrow never comes. I used to think cooking Dum briyani is difficult then the normal briyani which is cooked by mixing every things together, but it is not right. They both take same effort and same time.. Now I prefer dum briyani because it taste better then the normal briyani... I have not used deep fried onion in this recipe, i have saved it for one more recipe of dum briyani. Do try and let me know.


Ingredients.
1/2 kg Basmati rice 
Chicken 1/2 kg
Few strands for saffron 
2 big size onion, 4 tomato (finely chopped)
3 green chilly (chopped) 
4 to 5tbsp of chopped coriander and mint leafs
2tbsp Ginger, garlic paste
2tbsp red chilly powder, 1tbsp turmeric powder 
1tbsp coriander powder, 1tbsp garam masala 
1cup curd, 2tbsp lemon juice
Salt as per taste.


For Tempering.
2 bay leafs, 1 cinnamon stick, 2 green cardamom
2 cloves, 1 big black cardamom, 2 star anise
1tbsp shah jeera 
Oil as per your requirment.


Cooking method.
Wash and soak the rice in enough water for 20 to 30 minutes. In the same time soak the saffron also in warm water. 
Heat the deep frying pan add oil, when oil is hot, add all the tempering ingredients and leave till it become's brown. 
Then add onion, ginger garlic paste fry for till the onion becomes lite golden brown, then add chicken, turmeric, and salt, fry it till the chicken starts leaving oil. 
After that add red chilli powder, coriander powder and garam masala, give a quick stir, then add tomato, curd, lemon, green chilly, and cook till the tomatos becomes soft, then add 2tbsp of mint and coriander leafs and mix it well.
Half boil the rice in a seprate pan. add water in to rice as per it required's. Then in a separate big pan add one layer of chicken and one layer of half boiled rice. Then sprinkle from top saffron water and left over mint and coriander leafs. (you can make as many as layers you like, but i have made one 2 layers). Cover the lid and cook till the rice is completely cooked in a medium flame.
Serve hot hot with (Raita)


Thursday, January 10

Moong Dal And Vegetable Pulao.. (Pressure Cooker Version)

Vegetable Pulao. Usually people make pulao in so many different ways and there are many recipes and versions to it. Even i cook many version by adding different kinds ingredients, you can make recipe taste different by changing or adding any ingredients. In south India pulao's are very famous in every household because it is easy to make and very very tasty to eat any time of the day. As i have mentioned in my previous post that i don't like to eat much of rice items, i cook all types of rice items just because my hubby finds it very tasty and he feels cooking rice is easy then cooking roti's and sabji, but i feel both are the same.. When it come's to vegetable pulao i cook very often not because it taste good because it looks and smells good..


Ingredient's
1cup vegetable (potato, carrot, beans, mutter, cauliflower)
2cup rice (Basmati or normal rice)
2tbsp moong dal
1 medium onion and 2 green chilli (finely slice)
1 medium tomato (finely chopped)
1tsp turmeric, 1tsp coriander powder, 1tsp garam masala
Salt to taste
Coriander leaves for garnishing.


For tempering
1 bay leaves, 2 dry red chili
2 star anise, 1 cinnamon stick
2 cloves, 2 green and black cardamom
1tsp cumin seeds
3tbsp oil.


Cooking Method
If you are using basmati rice then soak the rice in water for atleast 30minutes, no need to soak the rice if you are using normal rice, just wash and keep it aside.
In a pressure cooker, add oil, when the oil is hot add cumin seeds and all the tempering spices, when they turn brown, add moong dal, when dal turns lite golden brown, add onion and green chillies, fry to golden brown.


Then add turmeric, coriander powder and garam masala, fry for 1 to 2minutes, then add all the vegetables and tomato, fry for another 1 to 2minutes. Now add the rice, salt and enough water, cover the lid and cook for 3 whistle (1 in high flame, 2 in low flame), then allow the pressure to go and open the lid and mix well.
Serve hot with Onion Raita.


Wednesday, January 9

Tomato Briyani..(Pressure Cooker Version)

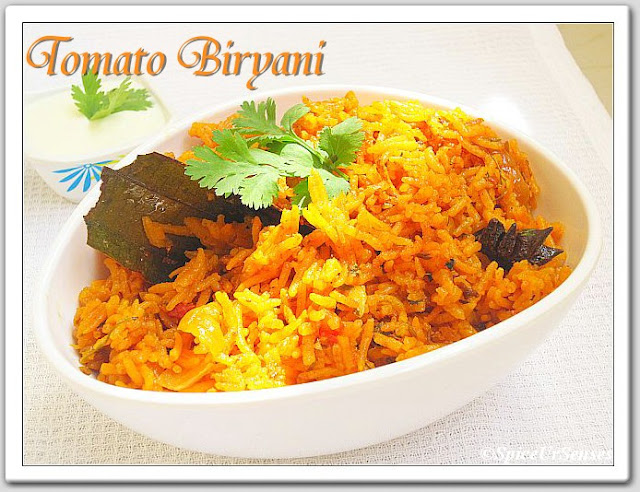
Tomato Briyani is very similar to Tomato rice with a little twist of ingredients. Tomato rice taste more a like tangy taste, but i have kept very less sour taste in briyani. Last week during his holidays i had cooked this one pot meal for the lunch and i serve with chilled yogurt raita. When ever you ask him shall i cook tomato rice he will never say no to it, he loves tomato rice but i'm not a big fan of rice items, i cook rice items just because he likes it and i enjoy seeing him eating.. This is my new innovation in briyani and my hubby like it very much. I hope my blog readers also like this recipe :)


Ingredient's
2cup Raw rice
1 Bay leaf, 1 Cinnamon stick, 2 Cardamoms
2 dry red chillie, 2 star anise 
2 Onions, 2 green chillies (finely sliced)
2 ginger garlic paste 
1 hand full of mint leaves 
1tsp Kasoori methi 
1tsp red chili powder, 1tsp turmeric, 1tsp coriander powder 
1tsp Cumin, 1/2tsp mustard seeds 
1/2cup curd
a pinch of food color 
Tomato 2 (large red tomatoes, finely chopped) 
Oil 2 tbsp 
Salt to taste 
Coriander leaves for garnish.


Cooking Method
Heat oil in a pressure cooker, add cumin, mustard, cinnamon, cardamoms, star anise, red chillies and bay leaf, stir fry 30 secs. Add the sliced onions and saute for 3minutes. Add green chili, ginger-garlic paste, mint leaves and kasoori methi and saute for 4-5minutes. Add red chili powder, turmeric and coriander powder and mix. Add chopped tomatos, curd and salt to taste, mix and cook till oil separates. Reduce heat, add the raw rice, food color, mix gentely, then add 3cup of water, close the lid and pressure cook for 3whistles (1 in high flame 2 in low flame)


Remove onto a serving bowl. Garnish with fresh coriander leaves. Serve warm with raita or any curry of your choice.


Related Posts with Thumbnails