Friday, December 31

Egg Less Chocolate Cake (Happy New Year 2011)

Happy New Year 2011
Happy New Year to every body. This time i am celebrating my first new year with my husband, and this is the happiest movement of my life. To celebrate my New Year i baked a egg less chocolate cake because this is his favorite cake and i always like giving him surprises and he loves it very much, his happiness makes me happy and feel special. This year we are having a blast :-)


Ingredient's
1 + 1/2 cup (170 g) all-purpose flour
3 tablespoons unsweetened cocoa powder (dutched/dark)
2 teaspoons baking powder
2 pinches salt
1 cup (220 g) sugar
2 teaspoons vanilla essence
3/4 cup (1.8 dl) milk
3/4 cup (1.8 dl) vegetable oil (flavorless) or butter


Baking Method
Preheat oven to 180 deg C
Grease a 9 inch (23 cm) cake tin.
Mix flour, cocoa powder, baking powder, salt, sugar and vanilla essence in a bowl.
Add milk, vegetable oil.
Mix everything together until smooth. If the batter is too runny you may add slightly more flour.
Transfer to bake tin and bake at 180 degrees until a wooden pick inserted in center comes out clean, approximately 30 to 35 minutes.
Remove form the oven and cool it for atleast 2 to 3hr

Then pour the extra chocolate on the cake and decorate with strawberry or anything what u like.


Wednesday, December 29

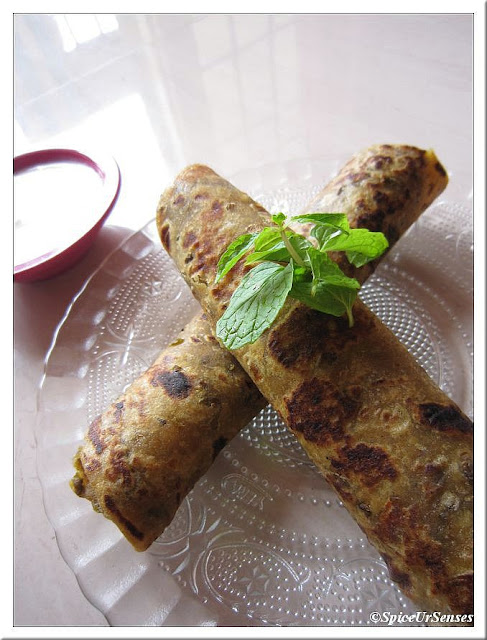
Green Gram Dal Parathas ( Whole Moong Dal)

I made this parathas with the left over dal. Yesterday for lunch i cooked Green gram dal and the quantity was more for 3 people. And i don't wanted to throw or keep it in the fridge, then i realize why not make parathas for dinner with this left over dal and guess what no body came to know this parathas was made by a left over dal. And i served with the curd and pickle it was tasting very good. To know the dal recipe visit to this link. http://rumanarawat.blogspot.com/2010/12/urad-dal-green-gram-and-black-urad-dal.html


Ingredient's
2cup of Cooked dal
2 cup of wheet flour
3 tbsp oil, Salt
Water as per required


Cooking Method
Mix dal, wheet flour, Salt and water , make a soft dough, finish the dough with oil and set aside for 30 minutes, Then make a small balls of dough and roll out the chapti and cook applying ghee or oil. 
Serve hot with Curd and Pickle. 


I am sending this to Priya's event MLLA # 30 which was started by Susan.


Saturday, December 25

Baked Stuffed Capsicum

Capsicum is a genus of flowering plants in the nightshade family, Solanaceae. Its species are native to the Americas, where they have been cultivated for thousands of years by the people of the tropical Americas, and are now cultivated worldwide. Some of the members of Capsicumare used as spices, vegetables, and medicines. The fruit of Capsicum plants have a variety of names depending on place and type. They are commonly called chilli pepper, red or green pepper, or sweet pepper in Britain, and typically just capsicum in Australian, New Zealand, and Indian. The large mild form is called bell pepper in the U.S. and Canada. They are called paprika in some other countries (although paprika can also refer to the powdered spice made from various capsicum fruit). The generic name is derived from the Greek word καπτο (kapto), meaning "to bite" or "to swallow.
Capsicum fruits and peppers can be eaten raw or cooked. Those used in cooking are generally varieties of the C. annuum and C. frutescensspecies, though a few others are used as well. They are suitable for stuffing with fillings such as cheese, meat or rice.
They are also frequently used both chopped and raw in salads, or cooked in stir-fries or other mixed dishes. They can be sliced into strips and fried, roasted whole or in pieces, or chopped and incorporated into salsas or other sauces. (Sources From Wikipedia)


3 to 4 Capsicum (simlamirch)
2 boiled potatoes
1 Onion finely chopped
1/4th tsp turmeric powder
Red chili powder to taste
1/4th tsp Garam masala
1/4th tsp Dry mango powder (amchur) 
Cashew 4 to 5
Salt To Taste
Oil for frying


Preparation:
Wash the capsicum and remove the inner part of it and apply oil and set aside
In a bowl mash the potatoes, now add all the ingredients with it , mix it nicely , In a fry pan add 2tbsp oil and fry the mixture for 5 minutes. Then take the capsicum and fill the mixture and keep cashew and apply oil on top. Take a baking tray and place the stuffed capsicum, bake in a Pre-heat oven for 30 minutes in 185c.
Garnish the stuffed capsicum with coriander leaves and. Serve hot.


Monday, December 20

Mutton Biryani

Biryani, a unique rice dish is relished by millions of people all over the Indian sub continent. It is made up of rice,spices and meat.In a way it can be compared to the casserole dishes of the west where all the ingredients are assembled and cooked together.It is a unique combination of rice, meat,yogurt and various spices, sometimes as many as 21 spices which include exotic spices like saffron and rose petals.
The most common version of Biryani is with meat and chicken, though in many homes all over India, the vegetarian version is also made, and is usually called Tehri or vegetable Biryani.Depending on the region it is made in, Biryani comes in various styles like Hyderabadi Biryani, Lucknawi etc each with its own distinctive regional touch. Biryani is usually served with raita,korma or curry.


Ingredients
1/2 kg Basmati rice
Mutton 1/2 kg
2 big size onion, 4 tomato, 3 green chilly, thinly slices
Pudina and Coriander leaves as per ur requirnment, finely chopped
Ginger, garlic paste 2tbs
2tbs red chilly powder, 1tbs turmeric, 1tbs coriander powder, 1tbs garam masala
1cup curd, 2tbs lemon juice
Bay leaves 3 to 4, 2 small elaichi (Cordamom)
Oil as per ur requirment
Salt as per taste


Cooking method
Wash and Soak the basmati rice for at least 8 to 10 minutes, Wash and cut the mutton and set it aside.
Heat up the pressure cooker add oil, elaichi, tejpatta, leave till it become's brown, Add onion, ginger garlic paste fry for 2mints, then add mutton, turmeric, and salt, fry it till the mutton starts leaving oil, Then add the all masala's stir it for 50sec, Add tomato, curd, lemon, green chilly, pudina and coriander leafs cook for 2 to 3 whistle, in a medium flam (NOTE DONT ADD ANY WATER IN THE CHICKEN) In a mean time, Half boil the rice in a seprate pan. add water in to rice as per it required's, Allow the pressure to go completely from the pressure cooker, Then in a big pan add the mutton and the rice mix it up slowly..
Cover the lid and cook till the rice is completely cooked in a low flame.
Serve it hot with (Raita)
Delicious Mutton Biryani is ready to serve....

Thursday, December 16

Soya Chunks Biryani (Pressure Cooker Version)

Soya biryani is a protein rich biryani recipe with the soya chunks cooked and then added to rice along with whole spices and garam masala powder.. This was my first attempt to cook the soya chunks biryani and it turned out as usual very tasty. I was not even prepared to cook this biryani but just because of my S-I-L i cooked this biryani. Even i was also thinking that our breakfast and lunch is being repeated again and again,so when i opened my draw i saw a pack of Nutarila soya chunks so i thought why not to give a try in soya chunk only. First i thought to prepare paluo and finally finished with biryani... And it was very tasty and very healthy too..


Ingredient's
2 cup of soya chunks
1/2kg basmati rice
2 cup of all veggie's (mutter, gobi, potato, carrot) cut in to small pieces
2 onion, 3 green chillies, 3 tomatos, finely chopped
1/2cup curd, 3tbsp of lemon juice
1tbsp red chillies powder, 1tbsp turmeric, 1tbsp coriander powder
1 cardamom , 3 tej pata, 3 dry red chillies
Oil and Salt as per taste


Cooking Method
Soak the soya chunks in water for 20 minutes, Then in a pressure cooker add oil, red chillies, tej pata and cardamom , after 20 sec, add onion and green chillies fry to golden brown, add all the masala powder, and fry 5 minutes then add tomato, curd and lemon juice and cook for another 5 to 10 minutes, Now add the soya, all the veggies and salt, then allow the veggies to soak the masala and then finally add the rice and water as per required, and cook for 3 whistle, 1 in high flame and 2 in low flame.
Serve hot with Raita.
Related Posts with Thumbnails